I bought Archetype Rocketry's clever and compact Cable Cutter a couple of years ago because it enables dual-deploy from a single volume. After struggling to find it all day I finally ran the following test tonight:
They recommend 0.1 ml of Pyrodex but all I have is black powder. I could probably get away with 0.05 ml but, considering the parachute "burrito" will be outside the rocket when the cable cutter fires, I think I'll stick with 0.1 ml just to be sure. I plan to fly a minimum diameter AT 1417K185 on Saturday using this system so wish me luck and [almost] Happy 2016!!
Thursday, December 31, 2015
Sunday, December 6, 2015
Holtville Launch, December 2015
Here are the photos but I was having trouble with the GoPro and only caught three liftoff videos:
I was the first flight of the day for the first time with the CTI 260H194 Red Lightnin', helped Darrel with his perfect CTI 2771L990 Blue Streak flight, and socialized a bit. The FAA just bumped our waiver from 10k to 15k so I need to get on that! The only hitch is that we need to launch from the corner of the runway so that's quite a trek. I could hear Paul Snow doing the remote countdown over the PA at the launch site and also on Darrel's phone about 1.5 seconds earlier. We didn't specify which was the fire countdown so I was late on the button in the photos. Also, when we got out there, my GoPro would not power on so I missed Darrel's epic liftoff. Duh.
I was the first flight of the day for the first time with the CTI 260H194 Red Lightnin', helped Darrel with his perfect CTI 2771L990 Blue Streak flight, and socialized a bit. The FAA just bumped our waiver from 10k to 15k so I need to get on that! The only hitch is that we need to launch from the corner of the runway so that's quite a trek. I could hear Paul Snow doing the remote countdown over the PA at the launch site and also on Darrel's phone about 1.5 seconds earlier. We didn't specify which was the fire countdown so I was late on the button in the photos. Also, when we got out there, my GoPro would not power on so I missed Darrel's epic liftoff. Duh.
Saturday, November 14, 2015
Wow I'm a shiftless varmint
My maternal grandfather, Hank, used to call people of questionable drive "shiftless varmints" [vemin] and that's how I would classify myself in the last several months in the rocketry context.
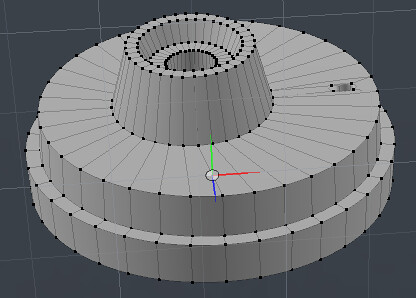
I last flew at Lucerne in June and at Holtville in October. I sort of took the summer off from flying because we're making the planet nearly unbearably hot. Yes its true. We are changing our planet's climate. We should reject the disinformation created by the fossil fuel oligarchy and disseminated by corporate shills beholden to them in our government. But I digress... I couldn't make the November Holtville launch because of an amazing cause. I was planning to attend Lucerne today as it's no doubt amazing up there but I wasn't sure what to fly as of yesterday. As such I started designing and 3D-printing electronics bay caps for what remains of the Viciously Mean Machine. After struggling for a few hours trying to make nylon adhere to the printer's bed I reverted to trusty fluorescent green ABS . Here's what I modeled in Modo:
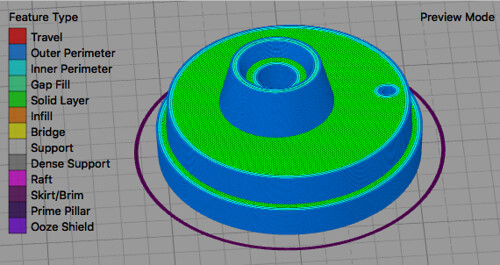
And here's the 3D-print preview in Simplify3D:
And here are the final prints from my CreatorBot 3D:
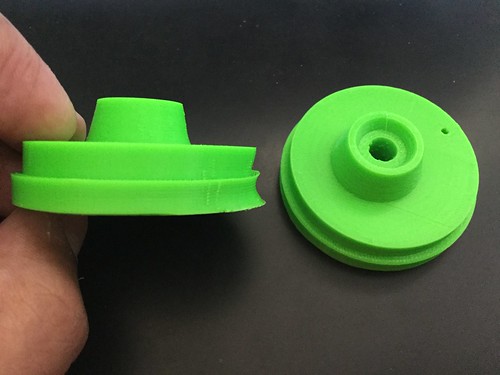
Not quite what I modeled right?! I think a raft would have remedied the edge curvature near the base but the curved edges at higher elevations confuse me. I think it's time to re-level my heated bed and try again. With a little sanding/drilling those caps probably would have worked with an AT 1417K185 today but, by the time I finished the two E-bay caps last night, it was too late to start packing. Now, at 8:47AM, I can't fathom the concept of driving up there through Saturday morning traffic to hurl a couple of sport flights. I will commit to doing more rocket building and repair this weekend and hope to post more updates soon.
I last flew at Lucerne in June and at Holtville in October. I sort of took the summer off from flying because we're making the planet nearly unbearably hot. Yes its true. We are changing our planet's climate. We should reject the disinformation created by the fossil fuel oligarchy and disseminated by corporate shills beholden to them in our government. But I digress... I couldn't make the November Holtville launch because of an amazing cause. I was planning to attend Lucerne today as it's no doubt amazing up there but I wasn't sure what to fly as of yesterday. As such I started designing and 3D-printing electronics bay caps for what remains of the Viciously Mean Machine. After struggling for a few hours trying to make nylon adhere to the printer's bed I reverted to trusty fluorescent green ABS . Here's what I modeled in Modo:
And here's the 3D-print preview in Simplify3D:
And here are the final prints from my CreatorBot 3D:
Not quite what I modeled right?! I think a raft would have remedied the edge curvature near the base but the curved edges at higher elevations confuse me. I think it's time to re-level my heated bed and try again. With a little sanding/drilling those caps probably would have worked with an AT 1417K185 today but, by the time I finished the two E-bay caps last night, it was too late to start packing. Now, at 8:47AM, I can't fathom the concept of driving up there through Saturday morning traffic to hurl a couple of sport flights. I will commit to doing more rocket building and repair this weekend and hope to post more updates soon.
Tuesday, October 6, 2015
Holtville Launch / October / 2015
You'll find this launch was slash-a-rific:
I realized that I don't have a ton to add here except that:
I realized that I don't have a ton to add here except that:
- My pictures of the launch reside here.
- The CTI 1115J530 Imax is a friggin' beast... as are all Pro38 6GXL reloads?!
- I'm a dunce and somehow reduced my delay about 4 seconds too short. The rocket felt so heavy as I was prepping but there was no wind so I'll take responsibility for 2 seconds of that. The other 2 seconds continue to perplex.
- That delay shortage caused a 1.5" zipper in the tube and also flung my AltimeterTwo somewhere in the desert; lost on its maiden flight no less.
Did I mention that it IS rocket science?
Friday, September 11, 2015
So I had this idea for a Punisher fin alignment jig...
Modeled in Modo, sliced in Simplify3D, printed in white ABS on a CreatorBot 3D:
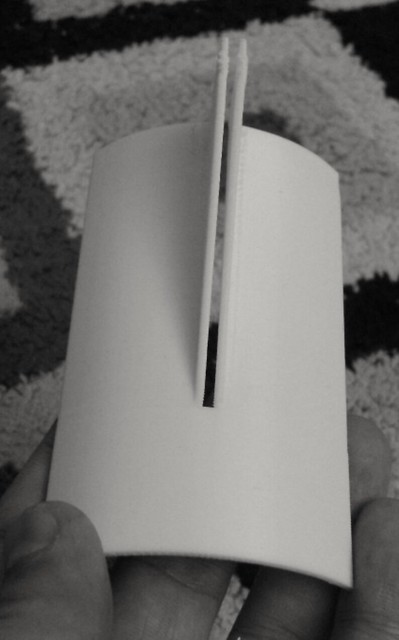
I'll give 'er a shot tomorrow. And I wish these and their inhabitants hadn't fallen victim to subjective indoctrination:

I'll give 'er a shot tomorrow. And I wish these and their inhabitants hadn't fallen victim to subjective indoctrination:
Saturday, September 5, 2015
And the Punisher replacement commences...
A few updates:
More soon and thanks for pushing my blog to 55k views. Yay, you!
- I missed the July and August Lucerne launches so nothing to see here from there.
- Just last week I realized that I'm unable to attend BALLS this year so that's a bummer. Hopefully in 2016 I will have repaired my Frenzy Massive and travel will come together.
- I did, however, begin rebuilding my Punisher airframe today and here's the motor mount as visual proof:
More soon and thanks for pushing my blog to 55k views. Yay, you!
Sunday, June 14, 2015
RocStock 41: Punisher got punished, M3100s kick ass!
For me it was drag race central at RocStock 41 at Lucerne Dry Lake. David Reese, Mr. Wildman West, organized an amazing deal for a Punisher kit, 2372K1440 White Thunder reload, Pro54/6G casing, and 54mm closure. It was a bit breezy when arrived at ~8:15AM on Saturday morning only to learn that I was supposed to be ready to fly by 8:30AM!! I managed to pull everything together for the Punisher drag race by 8:45 and mine was the sixth rocket on the table for weigh-in/check-in so I wasn't the last. Of the ten planned flyers only nine checked in and the following video summarizes the results (along with the M3100 drag race later in the day):
Not that I'm being cross-examined but I certify that I did nothing special to my K1440 reload. I added a bit of SuperLube to the threaded portion of the brand new Pro54/6G casing before inserting the reload, left the delay intact as an apogee backup, and used the stock igniter from CTI. I'm guessing my two counterparts who CATO'd would say the same so one theory was that the propellant might not have cured fully in this batch of reloads. This, in combination with the excessive heat and perhaps humidity, might have played a role in the 33.3% failure rate. Here's a link to an amazing liftoff shot from "Apex Horizon" on Flickr and mine is the center CATO (thanks to Mark Treseder for forwarding but this photographer has sharing turned off so I can't show it inline with my blog). The nosecone, electronics bay, and most of the recovery harnesses survived but here's what's left of my booster (I piled the other parts together atop the parachute):
Here are the Raven3's graph and tabular data from the brief flight. Note that the accelerometer maxed out at 315 Gees so I'll need to check with Featherweight Altimeters on that before flying it again. In the image above one fin is stuck in the ground and the other two presumably blew out as I assume the casing wall failed and overpressure the booster. This fiery activity also likely ignited the 2g bag of black powder and popped the three shear pins securing the electronics bay/nosecone thus saving those costly components. The Raven 3/250G also seems to have popped the nosecone after apogee, such as it was, thus releasing the parachute and further reducing impact damage. The booster was still smoking and, when I picked it up, flames arose. I then buried it in the lakebed clay for a minute or so and the flames extinguished. I returned the booster to David for failure analysis, unscrewed and kept the otherwise intact enclosure, and David immediately replaced the casing and reload. I'm hoping that a few months of extra curing time along with a plan to fly in cooler conditions will render this second K1440 viable. I plan to buy parts for another Punisher booster as this strikes me as a phenomenally volumetrically efficient design.
I was a bit shaken at this point but David verified he still wanted to fly our planned DarkStar Extreme/6118M3100 White Thunder drag race if I did. Since I'd already bonded the grains into the liner I really didn't want to leave that loaded up in my closet and decided to proceed as planned. As always it took awhile to disassemble the CD3 system used in the Punisher and rewire it, along with my second CD3, into the trusty DarkStar Extreme but I was ready at about 1PM(?). Kurt Gugisberg was our RSO and chortled as David and I approached. I asked what he wanted to know about this juggernaut of a rocket and he replied "Ummm... what color is your parachute?" and, while I answered factually, I later suspected he was referring to the business book of the same title. :) David and I set up on pads 41 and 42 and I'm very pleased that we both took off like bats out of hell and recovered our rockets safely. David noted that he heard applause after the race and both of us could clearly see our rockets from apogee all the way down. Here are the GPS plots from Google Earth as well as a recovery shot showing my landing less than 1/3rd of a mile away -- a rarity for any flight of mine:
Here are the M3100 altitude summaries:
- Beeline GPS: 15,462' (.kml file)
- ARTS2 baro = 14,999' (table, graph)
- Raven2 baro = 14,805' (table, graph)
- Average = 15,088'
Velocity / axial acceleration peaks:
- Raven2: 1121 MPH / 54 Gees
- ARTS2: 1195 MPH / 38 Gees
And here are the Motor Performance (6451M3506) and Coefficient of Drag plots from the ARTS2. Thanks to all my fellow drag racers and I look forward to future challenges!
Friday, June 12, 2015
Dude built a Punisher!
BAM!! Finish ya after the K1440 drag race tomorrow?
And here's a very aggressive 12g CO2 test for the nose cone:
And here's a very aggressive 12g CO2 test for the nose cone:
Saturday, May 16, 2015
Throwback to c.1981
I recently dug up and scanned a bunch of old photos for my friend's birthday and came across a few of possible interest to the rocketry community:
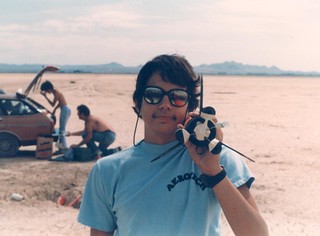
That's me at roughly 12 or 13 years old proudly sporting tethered, fold-up Vuarnet sunglasses; one of two pairs my grandmother had generously purchased for me on her vacation in France. Note also the custom-built Aerotech fanboy shirt with velvet, iron-on lettering. On the back I had made an attempt to run a popular slogan of the time: "Aerotech Gets High On NH4CLO4" and yes that's a capital L. Gary Rosenfield expressed confusion when he first saw my shirt and, in short order, having mentally inventoried the periodic table of the elements, was unable to recall this "L"ement. He was kind about it but, as a chemical engineer now, just know that I'm cringing and yes it should have read NH4ClO4. Duh.
I think that rocket was about 2.5" in diameter and ~5' tall and I called it Gaudior having recently read Madeleine L'Engle's A Swiftly Tilting Planet. I was having trouble with the motor mount diameters just now until The Google turned up this Canadian Crown Rocket Technologies (CRT) catalog [and check out the cornucopia of other retro gems on his site!]. The central motor was a 29mm F67 and the three outboard pods with individual nosecones held CRT 24mm E45 motors (with ejection charges removed). At the time the ignition method du jour for clusters involved sleeved Thermalite Fuse rigs with flashbulb initiators hence the disconcerting business end. Despite a slightly angled liftoff I was convinced the flight had gone as planned. Upon recovery, however, I observed that two of the E45s had CATO'd just after liftoff so I was a semi-sad kid that day and I don't think I rebuilt Gaudior. Damned bleeding edge rocket science! :) Oh and I used to paint all my rockets so I've only become lazy on finishing in the last decade or so.
Next up is Jim Jaworski prepping with a group of early high-power flyers in deep conversation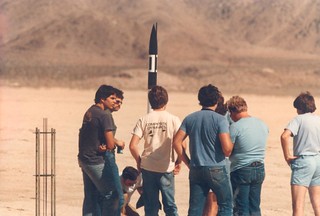
I'm at far left, Gary Rosenfield can be seen just behind me, Jim Jaworski is on the ground setting up his igniter, Jerry Irvine has his back to the camera, and I don't remember the other four fellas on the right. Despite Jerry's infamy in recent decades I always found him to be an extremely intelligent and thoughtful rocketry mentor and a good friend.
Now onto the flight... Jim Jaworski was in/famous for his beautifully built and finished rockets that pushed the total impulse boundaries beyond most of the group but, unfortunately, they often failed in some new way. I'm quite certain this was a J- or K-class ~2" motor with low initial thrust typical of case-bonded, progressive burn geometries of the day. Upon ignition the motor mega-chuffed the rocket off the rod then it laid horizontally on the ground awaiting additional chuffs and eventual ignition. Upon final pressure-up it then shot out horizontally across the desert in spectacularly undesirable fashion. Nobody was hurt and Jim recovered the rubble. We've come a long way with BATES grains and peak thrusts in the beginning with nice regressive traces that don't shred rockets. Someone must suffer these learning setbacks to advance our collective knowledge so... thanks, Jim!
I should note that Aerotech was already employing an early BATES grain precursor where they cast propellant into a cardboard tube. Once core-drilled this "cartridge" of propellant was dropped into the phenolic liner with glass-phenolic nozzle and the forward end sealed up with delay and ejection charge. As such AT motors were bleeding edge and featured end- as well as core-burning geometry. This gave them a nice initial kick off the pad but the high aspect ratio of the cartridge produced a humped thrust trace that wasn't quite the ideal regressive burn yet. Anyway kudos to Gary!
Sunday, May 3, 2015
Sunday build-day
I'm sad to report that I missed the Holtville launch yesterday but I got a second wind today, cleaned my garage workspace a bit, and did some building today.
David Reese of Wildman West Rocketry is hosting a Punisher drag race at Rocstock 41 in June at Lucerne. He offered up a limited edition Punisher kit bundle along with a Pro54 5G casing, closure, and K1440 White Thunder reload and I lucked into buying one before they stocked out. I know that David and Kurt Gugisberg are in on the drag race so I'm looking forward to losing to them. :) Here is Crazy Jim's version and he has has also posted a useful build thread on The Rocketry Forum:
 So I started building my 3" Punisher today and a whole bunch o' sanding prep was required for the motor mount, motor retainer, and centering rings but here's the assembly now curing in my garage:
This kit features a novel dual deploy scheme where the electronics bay resides in the nosecone shoulder and that coupler is shear pinned into the airframe and nosecone. It's a solid design and uses volume very efficiently. It's therefore atypically small and that 2372K1440 is going to kick it's ass into the sky with reckless abandon. K1440 don't care. K1440 just brutalizes what it wants.
I also continued the build of my Polecat Aerospace 7.5" V2 with 75mm motor mount. This this second build step anchors the motor tube with centering ring in the boat tail (one large centering ring and the airframe tube are used temporarily to center the motor tube in the boat tail while the epoxy cures below the fin slots):
David Reese of Wildman West Rocketry is hosting a Punisher drag race at Rocstock 41 in June at Lucerne. He offered up a limited edition Punisher kit bundle along with a Pro54 5G casing, closure, and K1440 White Thunder reload and I lucked into buying one before they stocked out. I know that David and Kurt Gugisberg are in on the drag race so I'm looking forward to losing to them. :) Here is Crazy Jim's version and he has has also posted a useful build thread on The Rocketry Forum:
This kit features a novel dual deploy scheme where the electronics bay resides in the nosecone shoulder and that coupler is shear pinned into the airframe and nosecone. It's a solid design and uses volume very efficiently. It's therefore atypically small and that 2372K1440 is going to kick it's ass into the sky with reckless abandon. K1440 don't care. K1440 just brutalizes what it wants.
I also continued the build of my Polecat Aerospace 7.5" V2 with 75mm motor mount. This this second build step anchors the motor tube with centering ring in the boat tail (one large centering ring and the airframe tube are used temporarily to center the motor tube in the boat tail while the epoxy cures below the fin slots):
April Lucerne launch report - Go, K300, go!
I flew my first CTI 2546K300 at Lucerne last month and I'm a big fan.
I busted out my robust but rarely flown Vertical Assault from Giant Leap Rocketry and the flight sim'd to 14,000' AGL. While I left my DSLR at home and my onboard keychain camera failed inexplicably just after starting it I did get some solid Beeline GPS data for Plotting in Google Earth:
I'm hoping that David Reese might have grabbed a liftoff photo that I can cross-post to this blog. :) [Update: David is my hero!]
The liftoff was relatively quick but the rocket exhibited coning at about 1000'. This makes sense since the Vertical Assault is overstable, even with a Pro54 6GXL motor, and was at a 2.8 static margin at liftoff. After the coning ceased the flight quickly sprinted out of site so I'm grateful I had GPS running. It's been awhile and I managed to forget that GPS reports via APRS to my radio report MSL (Mean Sea Level) numbers so I was a bit befuddled when the altitude reports stabilized at 3,079' high and 1.3 miles due north. In following the heading North I eventually saw an orange parachute briefly blow up above the heat convection ocean as if the rocket were saying "Howdy! I'm here!" Yet another 1+ mile jaunt found the rocket in solid condition:
There were some scrapes on the maroon-ish car paint but I'll wipe most of those off. The Raven2 (tabular, graph) reported maxima of 13,814' AGL, 799 MPH, and 38 Gees (that acceleration seems way too high). The GPS maxed out at 14,160' AGL so the average was 13,987' and that's pretty damned close to RockSim/OpenRocket's simulations! Since the Vertical Assault is mostly set up I think I'll fly a CTI 2772L640 Dual Thrust at Lucerne in May. Yay.
Sunday, April 5, 2015
Holtville Launch - April 2015
This last Saturday was amazing at Holtville and here's some slow-mo evidence...
I completed three simple flights using only my 3D-printed V2 and all with progressively longer CTI Pro24 reloads. I didn't risk an altimeter in any of them so all I have is my visual memory:
I completed three simple flights using only my 3D-printed V2 and all with progressively longer CTI Pro24 reloads. I didn't risk an altimeter in any of them so all I have is my visual memory:
- 2G 50F51 Blue Streak:
- In all three liftoff vids I see some lateral wiggle on the rod so perhaps the integrated rail guide isn't quite long enough. That's odd though because there seemed to me too much friction in the rail channel so I was planning to reduce the guide's cross section by a few percent. Dunno.
- Jittery liftoff above the rod so there's still not quite enough lead in the nose tip.
- The altitude was lower than expected and the 10 second delay about 4 seconds too long. More on this below.
- The landing was in some rock-laden dirt in the bowl and one of the fin bottoms broke. It was still attached, however, so I just CA-glued it back on for the second flight.
- 3G 60F50 Skidmark:
- Even these tiny 24mm Skidmarks ignite instantly and are impressively loud! Good titanium times.
- I had shortened this delay to 8 seconds but that was still about 2 seconds too long.
- The parachute fouled after eject but, surprisingly, there was no fin damage after landing in our bowl.
- 6G 140G145 Pink:
- The liftoff was most expeditious! I sort of noted some pink shades in the flame from a distance but it's hard to tell unless you're watching slow-mo video of the liftoff. :)
- Because of the higher thrust and total impulse I left this third delay at 8 seconds. The flight still ejected about 2 seconds after apogee and, upon watching that, it finally sank in that the uniform, 0.3mm high, radially oriented bands resulting from 3D-printing induce MUCH drag. For the next print I'll try 0.2mm layers and that will take several more hours to print but should reduce the drag coefficient somewhat.
- This flight achieved a surprisingly lofty altitude. Darrel had packed the parachute for me using the burrito method so it popped cleanly at ejection. Wind was building a bit so I had to walk to the north runway to retrieve the vessel.
- Having landed on concrete that same fin tip broke once again and this time the top 1/4" of the nose tip chipped off. This was OK because testing of this version zero design is a wrap and I'll move it to archive.
Apart from the issues I found over the four total test flights everything else worked surprisingly well. The structural integrity of the airframe and shock cord mounts proved more than adequate. I observed no melting from the casing heat or black powder ejection. But, in addition to the modeling improvements I'd planned previously, I think I also need to edit the following:
- Remove the vented portion of the motor mount - this doesn't seem to be necessary for robust motor orientation and it just adds complexity, tail weight, and print time.
- I think I'll maintain the rail guide length on version 1 and decrease the cross-sectional size by perhaps 2%.
- In the Simplify3D slicer it's possible to vary print parameters by layer height. As such I think I'll go with 60-70% internal fill from the glass plate to above where the fins meet the airframe to reduce the likelihood of damage upon landing.
- I think I'll use the same trick to beef up the nose tip and reduce it's tendency toward damage on concrete impact.
- I'll try 0.2mm layer height but this will increase print time on the airframe from ~15 hours to ~21 hours. Longer print times mean more opportunities for print defects so reprinting would necessarily delay the time to v1. Fingers crossed.
- I just realized I forgot a vent hole but the nosecone didn't pop off during ascent so I just lucked out. Rather than modeling and printing a hole I think I'll cheat and use a drill bit.
Onward and upward on the 3Dp tip!
Sunday, March 22, 2015
First flight of 3D-printed V2 a marginal success
I headed off to a local park this morning to test fly the 3D-printed V2 on a one-grain, Pro24 CTI 26E31 White Thunder:
It was tail-heavy so I predicted metastability and that's just what I got:
I've epoxied some lead shot in the nose tip and that's curing now. Next up will be a two-grain, Pro24 CTI 50F51 Blue Streak.
It was tail-heavy so I predicted metastability and that's just what I got:
I've epoxied some lead shot in the nose tip and that's curing now. Next up will be a two-grain, Pro24 CTI 50F51 Blue Streak.
Saturday, March 14, 2015
Holtville March 2015 launch report
It was another beautiful day in the desert although a tad windier than we're used to. I've been wanting to get my drone in the sky to shoot some liftoffs and that worked our rather dandily:
For some reason I forgot to set the controller to GPS mode so I was struggling to keep the thing where I wanted on the first few clips. The 480 fps liftoff of Mark Treseder's Skidmark is quite nice although I think that slow mo is generally wasted from the air. In the future I'll probably switch to 720p 120 fps mode as a nice balance between spatial and temporal resolution. Also, for the first time, I used Pocket Wizards to remote fire my DSLR while I flew the drone. Shit's gettin' complicated! Also Google rocks overall but I've officially switched from PicasaWeb to Flickr for my image posts from now on.
Upon recovery I noticed that all of the nozzle's divergent section and most of the throat were missing:
Lucky for me no other issues arose as a result of this blow out. I'm not sure if that was a faulty nozzle or perhaps the 4,500˚F Thermite caused a thermal gradient in the glass-phenolic nozzle and it shattered on pressure up. Dunno. The CTI 217H170 Blue Streak was next in the similarly trusty DS Lite and it landed in site of the launch pad:
Neato.
For some reason I forgot to set the controller to GPS mode so I was struggling to keep the thing where I wanted on the first few clips. The 480 fps liftoff of Mark Treseder's Skidmark is quite nice although I think that slow mo is generally wasted from the air. In the future I'll probably switch to 720p 120 fps mode as a nice balance between spatial and temporal resolution. Also, for the first time, I used Pocket Wizards to remote fire my DSLR while I flew the drone. Shit's gettin' complicated! Also Google rocks overall but I've officially switched from PicasaWeb to Flickr for my image posts from now on.
I had only two flights but was pleased with both. The first was the trusty 4" fiberglass Madcow Nike Smoke on an AT K1103X Propellant X reload for the 54/1706 casing. I should note that AT included the wrong seal disk O-ring but Paul Snow saved me with a spare from his archive. Thanks, Paul! Thermite seemed in order so I ran with 2g which was a bit higher than the 1g/1000 N•s guideline. Ignition was instantaneous according to Darrel who pushed the button for me (these two frames are 0.5s apart):
Darrel and I trekked my standard mile to retrieve the thing in a depression. Even with line-of-sight on descent I think I would have lost the rocket without the CTI tracker:Upon recovery I noticed that all of the nozzle's divergent section and most of the throat were missing:
Lucky for me no other issues arose as a result of this blow out. I'm not sure if that was a faulty nozzle or perhaps the 4,500˚F Thermite caused a thermal gradient in the glass-phenolic nozzle and it shattered on pressure up. Dunno. The CTI 217H170 Blue Streak was next in the similarly trusty DS Lite and it landed in site of the launch pad:
Neato.
Third time's a charm
Photos of 3D prints always make them appear far more coarse than they do to my eye but this third print is now ready to test fly:
This took 14 hours to print so, at some point overnight whilst I slumbered, that region near the top of the fins suffered from at least a one layer gap. My extruder is running very reliably after cleaning it out so I'm not sure why that happened. To patch it I simply ran a bead of thick CA glue around the perimeter and the airframe feels solid. Even before the test flight there are already things I need to change: 1) The bottom ring needs to be wider to ensure the motor retention washers do not hang out beyond the airframe edge. 2) I'm using #8 machine screws there but I think I'll switch to long #6 diameter equivalent wood screws and size the pilot ports accordingly. Right now they are very narrow so I ended up drilling out a bunch of material to fit the #8s. Again this should be good enough for a test flight... which I should have done today at Lucerne but I awoke wanting to continue sleeping instead. 3) There's a slicer setting in Simplify3D that's either "inside out" or "outside in" for shell print order. I'm quite certain I used "inside out" above so I'll try "outside in" next time and hope that it minimizes exterior noise. Now it's time to edit that vid...
This took 14 hours to print so, at some point overnight whilst I slumbered, that region near the top of the fins suffered from at least a one layer gap. My extruder is running very reliably after cleaning it out so I'm not sure why that happened. To patch it I simply ran a bead of thick CA glue around the perimeter and the airframe feels solid. Even before the test flight there are already things I need to change: 1) The bottom ring needs to be wider to ensure the motor retention washers do not hang out beyond the airframe edge. 2) I'm using #8 machine screws there but I think I'll switch to long #6 diameter equivalent wood screws and size the pilot ports accordingly. Right now they are very narrow so I ended up drilling out a bunch of material to fit the #8s. Again this should be good enough for a test flight... which I should have done today at Lucerne but I awoke wanting to continue sleeping instead. 3) There's a slicer setting in Simplify3D that's either "inside out" or "outside in" for shell print order. I'm quite certain I used "inside out" above so I'll try "outside in" next time and hope that it minimizes exterior noise. Now it's time to edit that vid...
Monday, March 9, 2015
I fixed my 3D printer!
After a grace period of seeming success I managed to clog my left nozzle and even shear the right one off! I fixed the left extruder and now I'm trying, for the third time, to print the V2 airframe:
On a hunch I suspected that I've had a mild to severe clog in the left nozzle ever since I bought the printer. I rolled the dice and ordered a tiny chuck and miniscule 0.38mm drill bit that cleaned 'er out and now I have yet to hear even a minor filament feed hiccup:
I just ordered a hand chuck and that, combined with a reverse-threaded extraction tool and replacement nozzle, should fix the right extruder.
Saturday, February 28, 2015
The airframe printed but with issues
I had hoped the airframe would have sufficed for a test flight but there are some layer splits that would likely fail. As such I've switched slicers and it's reprinting for another 15 hours. :)
Friday, February 27, 2015
V2 nosecone... PRINTED!

I found a flaw in the source model only after printing (note that ring/gap near the top). I've since fixed the flaw but this 8-hour print will suffice for test flights. The airframe is printing in black ABS now now and should be done tomorrow morning. Yay, printer.
Sunday, February 22, 2015
More OctoPrint goodness
It turns out that OctoPrint also provides a real-time preview of the GCode toolpath in the 3D printer:

The solid black line is the current bead in progress and everything else translucent is the previous layer. Nifty!
The solid black line is the current bead in progress and everything else translucent is the previous layer. Nifty!
Saturday, February 21, 2015
It's aliiiive!
I've struggled with a learning curve since Tuesday but, with perseverance (and significant assistance from Alex on the forums), I'm now up and 3D printing at home! I started by sending just the motor mount from the full-size V2 to test motor fit. Oh and all the print data moves wirelessly thanks to the brilliant Octoprint! More soon.


Sunday, February 15, 2015
Updated^2: Lucerne on 2/14/15 with M3700 viciousness
I finally got around to crunching some data so I'm updating this entry. Here's the video you might have already seen but go ahead and watch it again anyway (:
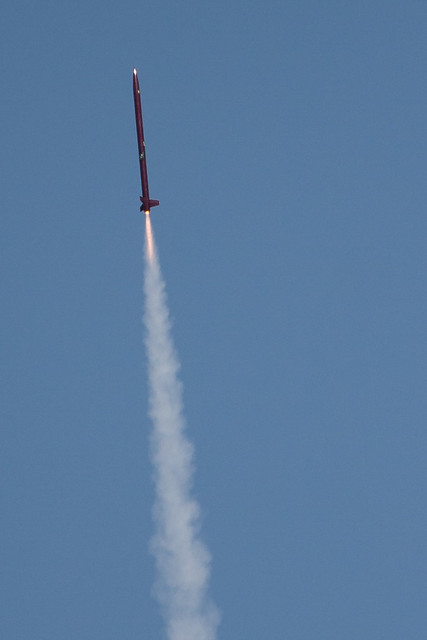
I'm astonished and pleased to note that I experienced two Saturdays in a row of impeccable flying weather. Holtville and Lucerne were similarly windless and a comfortable mid-70s all day. It turns out that I've had this CTI 6800M3700 White Thunder reload in storage since November 2009. Oops... tempus fugit! I was throughly committed to preventing additional aging so I packed only that necessary to fly this vicious motor in my trusty DarkStar Extreme. I bonded the grains into the liner the night before but, despite that and getting to the lakebed by 8:30AM, I still didn't fly until 11:30AM. I was totally on my own and was unable to shoot photos but Gerald Meux was LCO and he and I agree that must have been an ~10' flame during the blistering ascent. I lucked out for once and dual-deploy put 'er down less than 1/4 mile away from the pad:
I couldn't get the GPS transmitter working for some reason so you'll have to take my word for it. The ARTS2 (table, graph, motor analysis, CD) and Raven3 250G(table, graph) averaged to the following maxima:

Addendum: David Reese captured a liftoff shot and kindly shared the link to his Flickr site:
It's not quite a 10 foot flame as I originally thought (rocket - 8.5 ft.) but I'll take it! And he caught a proof-of-recovery shot as well:
Thanks for all you do, David!
I'm astonished and pleased to note that I experienced two Saturdays in a row of impeccable flying weather. Holtville and Lucerne were similarly windless and a comfortable mid-70s all day. It turns out that I've had this CTI 6800M3700 White Thunder reload in storage since November 2009. Oops... tempus fugit! I was throughly committed to preventing additional aging so I packed only that necessary to fly this vicious motor in my trusty DarkStar Extreme. I bonded the grains into the liner the night before but, despite that and getting to the lakebed by 8:30AM, I still didn't fly until 11:30AM. I was totally on my own and was unable to shoot photos but Gerald Meux was LCO and he and I agree that must have been an ~10' flame during the blistering ascent. I lucked out for once and dual-deploy put 'er down less than 1/4 mile away from the pad:
I couldn't get the GPS transmitter working for some reason so you'll have to take my word for it. The ARTS2 (table, graph, motor analysis, CD) and Raven3 250G(table, graph) averaged to the following maxima:
- Altitude, AGL: 15,846' (3.00 miles!)
- Velocity: 1,792 fps (1,222MPH, Mach 1.1... really?)
- Acceleration: 44.7 Gees (Raven3 = 54.4, ARTS2 = 35)
- ARTS2 Motor Performance: 7065M3605
The RocSimulation predicted a mere 15,300' AGL so I'm very happy with that altitude. I'm surprised by the velocity of only Mach 1.1 but that must be due to the short 1.8s burn time and 28.3lb liftoff weight. Finally there's quite a difference between the two altimeters on acceleration. The ARTS2 maxes out at 50Gees so I'm inclined to believe the Raven3 with it's 250Gee max.
The December launch at Lucerne was cancelled due to rain. Two months later there remained some photogenic puddles so that's one benefit:
Addendum: David Reese captured a liftoff shot and kindly shared the link to his Flickr site:
It's not quite a 10 foot flame as I originally thought (rocket - 8.5 ft.) but I'll take it! And he caught a proof-of-recovery shot as well:
Thanks for all you do, David!
Friday, February 13, 2015
M3700 grains are interesting...

...and now all four find themselves cozily bonded to their liner for tomorrow's flight!
Mini 3D print of a slightly larger 3D-printable design
Here's an earlier 3D print test of my 3D design below:

And here's a later test print in-hand:

This latter print came from a pair of replacement extruders we installed at work last week and they're working better than ever! I also received the ship notice on my home 3D printer and it should arrive soon. Stoked! In preparation I bought some clear polycarbonate filament from GizmoDorks.com as well as some glow-in-the-dark HIPS filament cause they're friggin' awesomely print-ready. Clear polycarb V2 anyone? Oh and the HIPS polymer is soluble in D-Limonene so it's a highly reliable structural material that can double as support material for complex and gravity-challenged designs.
And here's a later test print in-hand:
This latter print came from a pair of replacement extruders we installed at work last week and they're working better than ever! I also received the ship notice on my home 3D printer and it should arrive soon. Stoked! In preparation I bought some clear polycarbonate filament from GizmoDorks.com as well as some glow-in-the-dark HIPS filament cause they're friggin' awesomely print-ready. Clear polycarb V2 anyone? Oh and the HIPS polymer is soluble in D-Limonene so it's a highly reliable structural material that can double as support material for complex and gravity-challenged designs.
Wednesday, February 11, 2015
Holtville February 2015 launch report
OK so that was another epic launch at the Holtville. Zero wind, cool peeps, and hawt flyin' akshun!
I'm psyched that Frank Hermes made an appearance to inadvertently, if viciously, topple my GoPro with his clustered liftoff and perfect flight and recovery. Thanks a bunch, Frank! Darrel flew his J595 successfully and it too, was awesome. Finally Ron Rickwald flew a roaring M1315 in his Armageddon and good times were had by all. I posted my photos here and, if Google lamely redirects you to Google+, look for the thumbnail of the white arrow on the green background.
I had only two flights but both were on new motors from CTI. The first was my Polecat Aerospace 4" V2 on a Pro54/2G 699J145 Skidmark moonburner for an astonishingly stable liftoff and ascent on this long-burn beast of a Skidmark:

This motor ships with a 19 second delay but my 54mm delay adjustment tool only goes to -10 seconds. The shortest possible delay would be quite long for many rockets so... what up wid dat, Cesaroni? I adjusted to ~10.5 seconds and that was perhaps about 1 second too long but still ejected within the apogee window. Once again, without any wind, it felt like I walked a mile but let's check the geotag on my cell photo... and, in doing so, I discovered a use for the Maps feature in Lightroom 5.x!! Any image with embedded GPS coordinates can be imported and reverse-geotagged using Lightroom's map (click to enlarge):

I'm sure there's some clever HTML5 method to allow you to click on regions of the above but I'll just quickly walk through the features and employ those antiquated yet familiar hyperlinks instead:
I'm psyched that Frank Hermes made an appearance to inadvertently, if viciously, topple my GoPro with his clustered liftoff and perfect flight and recovery. Thanks a bunch, Frank! Darrel flew his J595 successfully and it too, was awesome. Finally Ron Rickwald flew a roaring M1315 in his Armageddon and good times were had by all. I posted my photos here and, if Google lamely redirects you to Google+, look for the thumbnail of the white arrow on the green background.
I had only two flights but both were on new motors from CTI. The first was my Polecat Aerospace 4" V2 on a Pro54/2G 699J145 Skidmark moonburner for an astonishingly stable liftoff and ascent on this long-burn beast of a Skidmark:
This motor ships with a 19 second delay but my 54mm delay adjustment tool only goes to -10 seconds. The shortest possible delay would be quite long for many rockets so... what up wid dat, Cesaroni? I adjusted to ~10.5 seconds and that was perhaps about 1 second too long but still ejected within the apogee window. Once again, without any wind, it felt like I walked a mile but let's check the geotag on my cell photo... and, in doing so, I discovered a use for the Maps feature in Lightroom 5.x!! Any image with embedded GPS coordinates can be imported and reverse-geotagged using Lightroom's map (click to enlarge):
I'm sure there's some clever HTML5 method to allow you to click on regions of the above but I'll just quickly walk through the features and employ those antiquated yet familiar hyperlinks instead:
- The pink dot at left represent the approximate center of our flight line at the Holtville Airport.
- The upper left image is Frank Hermes prepping his 2xJ760 + 2xK260 cluster.
- At upper right is the recovery location of my V2. While not quite a mile I used Photoshop's image analysis function in combination with the 50m scale line in the lower right of the screengrab to establish a recovery distance of 1508m (1600m = 1 mile to that's pretty damned near a mile as often anticipated! Did I mention that the ascent was straight and there was no ground wind?)
- The top-center photo is the crater my foot left in an animal's underground cavern whilst traversing back from recovering the V2. That's like... a size 12 and 12 inches deep. I heart you, critter, but it's time for a new tunnel!
- The lower left is the recovery shot of my 2.5" Madcow Nike Smoke after its Pro38/3G 395I55 Mellow flight as seen in the vid.
That's about all I got. Fun review?
Monday, January 19, 2015

Initial V2 modeling complete
This morning I added a shoulder to the nose cone and a shock cord attach hoop that's smooth to reduce stress points:

I also built a rail guide by downloading the .dxf cross section from 8020.net and extruding a virtual rail within which I could bevel/extrude:

The larger hole of the three near the motor mount will be the Kevlar shock cord attach point. I'll just tie a square knot or two in one end as an anchor and thread the cord up through the airframe to the nose cone. The two smaller, opposing holes in the base are guides for the wood screws to retain the motor. Finally I improved the leading edge taper of the fins and sharpened up the bottoms to maximize adhesion to the heated build platform.

The airframe alone will require 15 hours to print at 0.3mm layer height or 25 hours at 0.2mm layer height (!) so I want to minimize the risk that the part will pop off before it finishes.
I also built a rail guide by downloading the .dxf cross section from 8020.net and extruding a virtual rail within which I could bevel/extrude:
The larger hole of the three near the motor mount will be the Kevlar shock cord attach point. I'll just tie a square knot or two in one end as an anchor and thread the cord up through the airframe to the nose cone. The two smaller, opposing holes in the base are guides for the wood screws to retain the motor. Finally I improved the leading edge taper of the fins and sharpened up the bottoms to maximize adhesion to the heated build platform.
The airframe alone will require 15 hours to print at 0.3mm layer height or 25 hours at 0.2mm layer height (!) so I want to minimize the risk that the part will pop off before it finishes.
Sunday, January 18, 2015
Slice-a-rific
There are many free, open-source programs to slice 3D models into tool paths that can be used by a 3D printer. I downloaded a installed a few this morning including Cura, Slic3r and PrintRun/Pronterface. There's another package called Simplify3D that looks interesting, especially via this forum thread, but it's very steep at $140 and there's no trial version. I've used Slic3r before at work but I think I'm liking Cura more now and here's the tool path preview of the V2's fin can and motor mount:

Teal-green is raft and support material, red is the model's exterior shell, green are inner shells, yellow is volumetric fill (10%), and blue are travel moves without extrusion. Niceness!!
Teal-green is raft and support material, red is the model's exterior shell, green are inner shells, yellow is volumetric fill (10%), and blue are travel moves without extrusion. Niceness!!
Saturday, January 17, 2015
Better living through additive manufacturing of a V2!!
Some of you know that I've been dabbling in 3D printing for three-ish years. I ceaselessly admire the astonishing progress of garage-based hardware hackers using intellectual property from patents that have expired in recent years. It appears that the masses using democratized technology continue to move far faster than the corporations that developed the IP in the first place!! One new startup, 3D Printer Works, arose from a successfully funded Kickstarter campaign. I like their style and recently ordered their first product, The CreatorBot 3D, for home use:

And yes of course I upgraded to the pro package with dual extruders, a heated glass build platform, acrylic enclosure to prevent drafts, and the Raspberry PI with OctoPrint to enable WiFi printing. Who wouldn't?!
With a nearly unparalleled prosumer build volume of 2,592 in3 and 1 ft. x 1 ft build plate I decided that my first home project would have to be a V2 with a 24mm motor mount to take the full range of Pro24 reloads. This is the first rocket I've attempted to design in my go-to 3D package, Modo, and I'm very pleased with the initial version. I started with V2 scale profile images from the interwebs and used them as background images in Modo. I then added a cylinder and adapted the cross-sectional hoops to conform to the airframe shape. I added edge loops at the fin root locations and extruded the fins directly out from the airframe. The entire model below is previewed in Catmull-Clark Subdivision mode for maximum smoothness and that's the format I'll use to export the .stl files bound for equivalently smooth 3D printing:

That black feature in the center wireframe is a hypothetical Pro24 6GXL casing as a worst case motor length. While CTI presently offers only 1, 2, 3, and 6G casings in Pro24 I do see 4, 5, and 6XL on both David Reese's Wildman West page and CTI's page so I'll assume they're forthcoming some day soon. I still need to add features like the nosecone shoulder, shock cord mounts, and rail guide(s) but the exterior form exceeds my expectations and took only about 2 hours to complete. I also used Modo's powerful and astonishingly versatile bevel tool to build both the vented motor mount and the interior walls of the airframe in a single operation set:

I plan to print with ABS that flows and extrudes reliably at 230˚C but its glass transition temperature hovers around 105˚C (221˚F). NFPA specifies a maximum casing temperature of 200˚C for 160 N•s or smaller so this could be an issue. ;) As such I think that venting the motor tube inside the airframe will decrease the likelihood of structural failure due to motor casing heat. If I observe melt damage I can always add exterior vents to the airframe and maybe I'll make them whistle while I'm at it. For the first flight I'm just planning to use two diametrically opposed, wide-head wood screws and perhaps washers for motor retention. Here's a top view showing the virtual 6XL casing in it's vented motor mount:

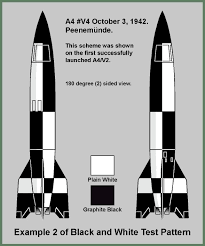
Once the model is finalized I also want to cleave it into pieces such that it can be printed in black and white using the dual extruders and according to the scale painting pattern so no painting will be required (and you know I LOVE painting!):
This first design will be 3" in diameter and 24.5" long. At the limit I should be able to design and print a roughly 10" diameter V2 in four vertical segments. More on this soon as my printer should arrive in the next two weeks. Yay, 3Dp!
Addendum: The site 3DPrint.com recently published this article on Steve Jurvetson who's advocating 3D printing for hobby rocketry for many good reasons. He also gives a genial introduction to rocketry and finishes with some cool SpaceX stuff. The revolution will be webcast!!
And yes of course I upgraded to the pro package with dual extruders, a heated glass build platform, acrylic enclosure to prevent drafts, and the Raspberry PI with OctoPrint to enable WiFi printing. Who wouldn't?!
With a nearly unparalleled prosumer build volume of 2,592 in3 and 1 ft. x 1 ft build plate I decided that my first home project would have to be a V2 with a 24mm motor mount to take the full range of Pro24 reloads. This is the first rocket I've attempted to design in my go-to 3D package, Modo, and I'm very pleased with the initial version. I started with V2 scale profile images from the interwebs and used them as background images in Modo. I then added a cylinder and adapted the cross-sectional hoops to conform to the airframe shape. I added edge loops at the fin root locations and extruded the fins directly out from the airframe. The entire model below is previewed in Catmull-Clark Subdivision mode for maximum smoothness and that's the format I'll use to export the .stl files bound for equivalently smooth 3D printing:
That black feature in the center wireframe is a hypothetical Pro24 6GXL casing as a worst case motor length. While CTI presently offers only 1, 2, 3, and 6G casings in Pro24 I do see 4, 5, and 6XL on both David Reese's Wildman West page and CTI's page so I'll assume they're forthcoming some day soon. I still need to add features like the nosecone shoulder, shock cord mounts, and rail guide(s) but the exterior form exceeds my expectations and took only about 2 hours to complete. I also used Modo's powerful and astonishingly versatile bevel tool to build both the vented motor mount and the interior walls of the airframe in a single operation set:
I plan to print with ABS that flows and extrudes reliably at 230˚C but its glass transition temperature hovers around 105˚C (221˚F). NFPA specifies a maximum casing temperature of 200˚C for 160 N•s or smaller so this could be an issue. ;) As such I think that venting the motor tube inside the airframe will decrease the likelihood of structural failure due to motor casing heat. If I observe melt damage I can always add exterior vents to the airframe and maybe I'll make them whistle while I'm at it. For the first flight I'm just planning to use two diametrically opposed, wide-head wood screws and perhaps washers for motor retention. Here's a top view showing the virtual 6XL casing in it's vented motor mount:
Once the model is finalized I also want to cleave it into pieces such that it can be printed in black and white using the dual extruders and according to the scale painting pattern so no painting will be required (and you know I LOVE painting!):
This first design will be 3" in diameter and 24.5" long. At the limit I should be able to design and print a roughly 10" diameter V2 in four vertical segments. More on this soon as my printer should arrive in the next two weeks. Yay, 3Dp!
Addendum: The site 3DPrint.com recently published this article on Steve Jurvetson who's advocating 3D printing for hobby rocketry for many good reasons. He also gives a genial introduction to rocketry and finishes with some cool SpaceX stuff. The revolution will be webcast!!
Wednesday, January 7, 2015
Happy 2015, Holtville!!
Hi, all, and happy 2015 to you as well. Last Saturday was a stunningly perfect day for flying with 0-3MPH winds all day and all the way to the top. Here's the second installment of my 240-slowed-to-480fps liftoff vids (full-screen HD and crank that audio please):
Go, GoPro!! I can't believe how much downward force is exerted on those steel pads! They're bouncing awhile after liftoff in several sequences. Here are are some photos I was able to shoot between flying and moving the GoPro. As you might have noticed in the vid I made two errors involving our equipment manager, Mike Caplinger, at this launch:

The ascent was neck-snappingly fast, loud, and straight with a nice 14+ second coast to apogee. Unfortunately the 'chute fouled but, fortunately, it landed in some soft dirt and remains entirely intact and ready to fly again:

Darrel Kelley and I discussed the fouling and he recommended this Fruity Chute method to reduce line tangle so I'll try that next time. Thanks for reading and cheers to another year of great flying weather at our new site.
Go, GoPro!! I can't believe how much downward force is exerted on those steel pads! They're bouncing awhile after liftoff in several sequences. Here are are some photos I was able to shoot between flying and moving the GoPro. As you might have noticed in the vid I made two errors involving our equipment manager, Mike Caplinger, at this launch:
- I missed his 2-stage liftoff because he was prepping intently and then was ready all of a sudden and I didn't want to interrupt his launch sequence by asking him to pause while I ran over to start my camera.
- I left my K2045 alligator clips dangling underneath the motor. It wasn't until later when he expressed vigorous concern with the damaged clips that I realized ignition exposure isn't as brief as I had once assumed. In my defense the e-match leads were very short and others flew after me but I'll be sure to somehow secure them out of harm's way in the future, Mike.
The ascent was neck-snappingly fast, loud, and straight with a nice 14+ second coast to apogee. Unfortunately the 'chute fouled but, fortunately, it landed in some soft dirt and remains entirely intact and ready to fly again:
Darrel Kelley and I discussed the fouling and he recommended this Fruity Chute method to reduce line tangle so I'll try that next time. Thanks for reading and cheers to another year of great flying weather at our new site.
Subscribe to:
Posts (Atom)
