Monday, December 21, 2009

Kick-off: 7.5" Der Red Mix

This will be my first scratch-built, upscale design. As a kid I built the 1.6" diameter Estes kit "Der Red Max" and found the design appealing and the decals amusing. I'm not a fan of huge fins so on my design I've taken the liberty of scaling them down to just enable a static margin of 1.16 with the heaviest motor array (L935, 2xJ530, 4xI224). While 1.16 might sound low for a cluster I've learned to trust RockSim's stability equations and find the original Barrowman equations to be too conservative. Also I'm not likely to fire the cluster on the ground and will probably always start with a powerful 54mm motor to send the rocket up and away before igniting outboard motor pairs. Here are some screengrabs from RockSim 9:
I'm still working out the details of the electronics bay but I plan to seat a removable trap door just above the fin tops to conveniently seat two multi-function altimeters and a Flip MinoHD video camera. The onboard video should rock! I've slowly been buying components for this design from Jack at What's Up Hobbies as well as Loc Precision. I also ordered my first set of laser-cut fins and centering rings from Balsa Machining Services and an AMAZING set of decals from Mark Hayes at StickerShock23.com. Here's the array of parts pre-assembly:
The fins are only 1/4" thick so I'll reinforce both sides of each with one layer of 6 oz carbon fiber to improve rigidity. Having just cleaned my garage I plan to start on this build ASAP!

Sunday, December 6, 2009

Plaster City Launch, 12/5/09

I had three goals for this month's launch:
  1. Test my Beeline GPS on a lower altitude flight to visually verify the position data. I also wanted to test a G10 fiberglass support I'd cut to stabilize the otherwise fragile electronics board/antenna.
  2. Test thermite ignition on an older Redline motor like the I366 I've had for seven years as these are notoriously slow starting.
  3. Fly my Viciously Mean Machine on a CTI J360 Skidmark (Pro 54, 3-grain).
I was mildly breezy and very cloudy when I arrived at about 10:15AM. If we weren't in the desert it probably would have been raining. I headed over to Jack Garabaldi's trailer to buy some components and a CTI 55F29 Imax motor for my GPS flight. I set up the GPS unit in the payload of my AT Arreaux and Frank Hermes helped me set my radio up to receive the APRS packets to monitor the flight's position every 5 seconds. I trimmed the F29 motor's delay from 12 seconds to 9 seconds forgetting how weak an F29 was. I really haven't flown mid-power for about a year now. Basically I should have used a 5 second delay on this cold day because 9 seconds was way too long. I came painfully close to crashing my $300 GPS unit on it's first otherwise underwhelming flight! I stripped two parachute strings but the whole thing came in tethered and fluttering. Everything was intact and I was able to download the flight profile successfully:
At first I was trying to figure out why the rocket only flew to 269 feet then realized that GPS altitude is recorded in meters. As such I actually attained 882 feet. Much better. :) I'm also confused by the region marked "What's this?" That's about where the 'chute finally ejected but it certainly didn't shock upward or sideways. Besides this isn't an accelerometer-based device and should only be storing actual GPS coordinates every second. Weird.
Then I spent another two hours prepping the Viciously Mean Machine for a dual deploy flight using the Parrot2 altimeter and the predictably spectacular J360 Skidmark. I finally got it out to the pad to discover a) I had managed to misalign the rail guides so there's no way I could fly it and b) looking up the 8+ foot skinny rocket that the payload section was warped. I had used Blue Tube 1.0 for the payload section and read that it was subject to warping at higher humidities. I had never noticed the curve while building so perhaps it happened afterward. I threw that part in the trash today as it's a total loss. I need to decide now if I want to try Blue Tube 2.0 for the rebuild. I feel pretty burned right now because I spent a great deal of time and money reinforcing the tube and coupler with two wraps of carbon fiber each. I disassembled everything and packed it away.
Finally I quickly prepped my horribly battered and thrice repaired LOC Bullet with a CTI 660J381 Skidmark. I really can't get enough of these loud and impressive motors. The flight was cool and uneventful except the ~1.5 mile walk east since I'd used a 45" parachute. I was able to track it visually but I'm still glad I put my radio tracking beacon in there as an insurance policy. I left the AVCHD camera on it's tripod during my roughly half-hour walk and captured some other flights before the wind wall kicked up effectively shutting down the launch for the day:
The song is Tenori by Francois Dubois. I never got around to the thermite ignition test but I vow to git 'er dun one of these days!

Thursday, November 12, 2009

PB2k9: 7.5" Nike Smoke on M1939

For my 2008 birthday present my parents kicked in half of the cost of an Aerotech M1939 motor. They drove all the way out from Cochise, AZ for last year's Plaster Blaster which was almost completely blown out by wind. We made several other attempts to link up in the ensuing year to get that motor flown. Mother Nature cooperated this weekend and, on Sunday, I was finally able to launch the beast. I used my L3 7.5" Nike Smoke as I'd actually built and reinforced it for this particular motor. Here's a liftoff photo:

Some might notice that, much to my chagrin, the shot is clearly back-focused. I'm certain that I had a clean focus lock on the rocket before flight so I'm not sure what went wrong here. In any event you get the idea and I attained just under 10,000' on this impressive flight.
Update: Thanks to Scott Eadie who shot video of the flight. My AVCHD hard disc was full so I had no video documentation until now:

For some reason the Parrot2 altimeter did not record any data so I only have the AltAcc graph and summary:
I dedicated this flight to my parents 'cause they rock! Again Roy and I had to walk north over a mile to get this 50 pound beast back. We were exhausted! I can honestly say that this was THE best launch of my life and I'd like to thank my parents, Frank Hermes, my friend Kristine, and Mother Nature for that!

Pb2k9: .38 Spatial in the Skidmark mass launch

I'd planned many flights over the weekend but prep and recovery took much longer than expected so I only had three flights total. The middle flight was on Saturday night and my new .38 Spatial was one of 21 rockets launched simultaneously on the new CTI H123 Skidmark motor. This propellant formulation isn't new but, with recent California State Fire Marshall approval, these impressive motors pretty much dominated the launch. They employ particles of titanium metal in the propellant that burn bright white/orange and pop loudly. In aggregate a single Skidmark motor yields thousands of these sparks and, as a result, roars loudly well above a normal motor's decibel level. Here's a video of all 21 rockets launching at once (well 20 if you exclude Frank's entry which failed to ignite due to my error):
Here's another of the seven including .38 Spatial (third from the right):
And here's a photo of my design isolated with some nice dusk lighting:
This launch was the clear crowd pleaser of the weekend. John Bowman did an excellent job of coordinating the event and the crowd loved it!

PB2k9: Em-Sem-Fity on M750 - 20,212 feet!

Frank and I conducted the successful M750 drag race just after 10AM on Saturday. Here's a video covering prep and flight:

Here's a liftoff photo verifying Frank Hermes' clear victory in this M750 drag race:
The flights were quick, impressive, and invisible after the smoke charges burned out. I should also note that frank topped 21,000' and, in a separate flight, Mark Clauson attained his level 3 AND topped 22,000' for a club record! Here's his video of the race:
Here's my Parrot2 Altimeter graph and summary:
Here's the way too simplistic summary from the G-Wiz LCX:
I'm likely to sell the LCX and buy the HCX at some point because that's just not enough data to bother! Note the lack of calibration 'cause this is the first time I'd used the device and failed to RTFM. Therefore the acceleration and velocity numbers are wrong. The barometric sensor does not require calibration so the altitude number should be correct. The average of 20,788' and 19,635' is 20,212'. Yay! President's Challenge mission accomplished.
I'd planned to use my GPS transmitter for this flight but realized the fragility of the antenna and the carbon fiber exterior of Em-Sem-Fity was guaranteed to insulate the device from satellites. In the end I used my trusty radio tracker system and walked right up to the rocket roughly 2+ miles north of the launch site. The rocket was entirely intact and dual deploy appeared to have worked perfectly:
While cleaning up the photo sequence of the drag race I noticed something interesting... my flame clearly appears weaker than Frank's. I normalized our two flights using Photoshop and added ruler lines for comparison:
In prepping my motor I heard rumor that I shouldn't use the disposable forward seal disc. I checked with Gary Rosenfield and Karl Baumann from Aerotech (conveniently in attendance at the launch) and Karl was surprised that I had a disposable seal disc. He asked for the lot number but now I only have my nozzle pack serial: 071007. Unfortunately I disposed of the four grain boxes. In any event Karl commented that this M750 reload must have been from an early production batch. As such I must assume that a) my reload was in the neighborhood of 2+ years old and b) there could be an aging effect on this motor that reduced its total impulse and/or average thrust. I'll follow up with Gary and request his input.
Frank challenged me to a rematch at Plaster Blaster 2010. If we do this I'm going to request two sequential serial number reloads built in the same recent lot. For now I'm elated that I exceeded 20,000 feet for a new personal altitude record.

Plaster Blaster 2009 report forthcoming

I'm still editing video, cleaning photos, and reducing data. I hope to have my report done this week. Executive summary: GREAT SUCCESS!!

Wednesday, November 4, 2009

New Vessels for Plaster Blaster

From left-to-right:
  • 4" Em-Sem-Fity (also known as "Frank's worst nightmare")
  • 54mm minimum diameter Viciously Mean Machine (106" long for a roughly 50:1 aspect ratio)
  • 3" Vertical Assault mark II - fixed and freshly painted
  • Me in a sport coat and Prada loafers (so as not to offend those who fear the casual look and bare feet)
  • [By popular demand] .38 Spatial minimum diameter (Up and... gone... Oh wait there's the beacon!)
  • 4" V2

Saturday, October 24, 2009

Thermite ignition tests

[Disclaimer: I assume no responsibility for use or misuse of this information. It's available elsewhere on the Internet and I'm simply sharing my engineering interpretation of that information. Use these materials with great caution. Do not mix reactants until just before use. Do not mix or ignite them anywhere near flammable materials. Do not look directly at the reaction as harmful UV radiation is emitted. Be careful!]
If you watch Mythbusters then you'll likely have seen their experiments involving thermite. According to Wikipedia Hans Goldschmidt discovered and patented this thermite reaction in 1893 and used it to both cut and weld metal. These powdered mixtures require very high ignition temperatures (2000˚F) but then burn at 4,500˚F swapping oxygen, producing molten metal, and releasing a bunch 'o' heat and UV radiation. Common reactants include elemental aluminum or magnesium with metal oxides like copper (II) oxide (cupric oxide) or iron (III) oxide (ferric oxide).
Many folks in high-power rocketry are successfully using thermite as a source of instant ignition of even the largest rocket motors using a guideline of roughly 1 g thermite per 1000 N•s of total impulse. I'm intrigued both by the reaction itself and its utility in this hobby so I decided to give it a try. I ordered 1 pound each of aluminum powder, cupric oxide, and ferric oxide online. I'm quite certain I overpaid as well so you should definitely compare prices on the Internet(s). :) I was finally able to use my chemical engineering degree and calculated the appropriate mass ratio of the reactants using stoichiometry and atomic and molecular weights. For the aluminum + ferric oxide reaction it's:

Fe2O3 + 2Al → 2Fe + Al2O3 + heat + UV

2 moles of Al = 26.98 g/mol * 2 moles = 53.96 g
1 mole of Fe2O3 = 159.69 g/mol * 1 mole = 159.69 g

So the mass/weight ratio is almost exactly 1:3 Al:Fe2O3

For the aluminum + cupric oxide reaction it's:

3CuO + 2Al → 3Cu + Al2O3 + Heat + UV

CuO: 79.545 g/mol * 3 mol = 238.635 g
Al: 26.981g/mol * 2 mol = 53.962

Mass/weight ratio: 4.4:1 CuO:Al


I set up my video camera intending to share the clips here but the ignitions were so fast that they only show up on about 4 frames at 30 frames per second. As such I've simply grabbed the key frames and assembled sequences for both tests. This camera method also eliminated the need to directly observe the reaction although the emitted UV might have improved my tan a bit. Here a single electric match ignites 0.5 grams of a molar ratio of ferric oxide + aluminum powder thermite:
Ignition was fairly rapid but continued to sputter for about 30 seconds afterward. In this second experiment I again used a single electric match to ignite 0.5 grams of a molar ratio of cupric oxide + aluminum powder thermite:
This second combination appeared to be far more energetic and burned to completion without sputtering. Most folks have been using this cupric oxide+Al combination but I wanted to try the classic ferric oxide+Al combination as well. It's clear that cupric oxide works way better so I now have my empirical answer. Again... exercise caution!!

Monday, October 19, 2009

CD3 ejection ground test for M750 flight


It worked perfectly with only 12g of CO2!

CF minimum diameter build progress

So I've made some progress on the Viciously Mean Machine and unnamed 38mm spike below. I've applied Cotronics 4525 high-temperature epoxy fillets to all fin/body interfaces and laid up tip-to-tip carbon fiber reinforcement on all fin pairs with Aeropoxy. I've also post-cured both tubes in the oven for 1.5 hrs and, let me tell ya, those fins aren't budging even 1mm!!
This week I plan to build/reinforce the payload sections and couplers and start the finishing process. Both should be lookin' purdy by PB.

Thursday, October 15, 2009

Thunder & Lightning mark II pix

Thanks to Jeremy Rich for these shots of the I357/I211 flight covered below!
A reminder that... yes I did get all parts back intact. I don't buy into miracles yet I'll admit that this vessel should not be sitting in my garage ready to fly again immediately!

Saturday, October 3, 2009

Even more carbon fiber success

I was finally able to lay up two new 38 and 54mm minimum diameter designs with 2 wraps of 6 oz carbon fiber cloth and cure them in 1 hour with a nearly perfect finish. The key seems to be plugging in the curing oven right when you place the part and then unplugging at exactly 1 hr. I then let both tubes cool down in the oven for about 1/2 hr then pulled the Mylar™ film and release fabric off while they were still warm to the touch. Here are the finished tubes and I'm tacking the fins on with JB Weld Quick:
I have one batch of high-temp black epoxy left and I want to use it on both designs so all fins need to be tacked down and ready. Knowing that Derek Zoolander stands 5'6-1/2" tall I've built this comparison to my new designs for scale:
I really shouldn't even be talking about these designs because they're really-really, really-really, ridiculously good looking.

Sunday, September 13, 2009

Lucerne launch report, 9/12/09

I arrived on the playa at about 8:45AM yesterday to extremely calm conditions. Jack Garabaldi had already opened is awesomely stocked What's Up Hobbies store and I dove right in buying components and new motors. The ROC folks were just beginning to set up the range but this seemed fine due to the complete lack of wind.
I'd begun prepping my main Thunder & Lightning mark II flight the night before to save time on Saturday morning. It still took another hour to assemble the motors, finalize the electronics and black powder charges, pack the 'chutes, and load up the tracking beacon. Just as I was finishing the preparation i felt the "breeze" kick up. This rapidly increased to 10-15 MPH winds so once again Mother Nature enjoys throwing challenges our way. Rockets and wind simply don't mix. I'd intentionally chosen a punchy booster motor, the AT I357 which burns for 1 second, and also shortened the sustainer's AT I211 ignition delay to only 1 second after booster burnout. Both of these tactics targeted minimal wind arcing to improve the likelihood of success.
I got everything set up on pad 21 but then asked the launch control officer to wait for a lull in the wind before launching. When finally launched everything on the I357 boost looked good. The one second delay before the I211 ignited in the sustainer felt more like three seconds. Then the I211 chuffed and conveniently popped off the booster section thus eliminating flame damage. After another chuff the I211 finally pressured up when the rocket was roughly 40 degrees from vertical. Oops. It powered off into the desert blue and, after I lost it visually for a bit, I again saw it drifting downward under the main 'chute. I had to walk roughly 1.2 miles out to retrieve it and the whole time I could see the parachute popping up and dragging my beautifully painted rocket along the lakebed. Here I've tucked that main back in and shot a quick photo indicating the distance:
Nice. Did I mention I'm not a huge fan of wind? I was surprised to see that the main parachute ejection charge had not worked. So why had the main popped out? Dunno yet but I considered myself very fortunate and would analyze the next day.
After gathering up both the sustainer and booster. I started cleaning the cases and it became very apparent that the wind wasn't planning die down any time today. I packed up and headed to the Pomona Fairplex to view a Dock Dogs competition.
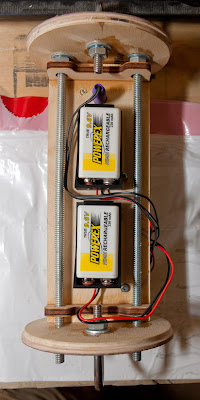
Fast forward to today, Sunday, and I was able to disassemble the sustainer's electronics to analyze the near failure. I was surprised to see that the 9V NiMH rechargeable battery had bloated and warped in several directions. Also the electrical tape had burned a bit so something must have shorted after the drogue charge popped and killed the battery before the main charge could kick off:
The force of the drogue ejection must have fortuitously popped the nose cone and released the main 'chute thus saving the rocket to fly again.
Based on some reading on the ARTS2 altimeter I rigged up the above battery connector to bypass the current limiter and run both the flight computer and pyro charges off of a single battery that fits in PML's CPR3K ejection system. I've flown this configuration successfully several times but took a bit of damage on the battery connector cap last time. I thought the electrical tape would have sufficed to insulate the connectors but either that or one of the battery wires must have failed. I'll build another bypass connector and replace the battery to get back on track. I should also note that the I211 I used was manufactured in 2001. I've never had issues with older motors when ground starting but another important precaution in the future will be to only use fresh Aerotech motors in upper stages or air-start clusters. I think the instant-on nature of Cesaroni motors also lend themselves very well to these air-start configurations.
I wasn't able to take any flight photos but a flyer named Jeremy Rich did snap some and gave me his card. I e-mailed him this morning and look forward to hearing back. I'll post his photos here when I receive them.

Thursday, August 27, 2009

Thunder & Lightning mark II

Several years ago it took me 5 years to build and fly my first PML Thunder & Lightning. I was psyched on the paint job at the time and my amazing and beautiful ex took this photo for me:
Unfortunately I set the upper stage timer for three seconds rather than 0-1 seconds and that beautiful rocket powered into the hard desert dirt at about mach 1 on its maiden flight. That flight also killed my prized AltAcc2A altimeter. Undaunted I lucked out and replaced that altimeter with the 2C version and purchased another T&L kit. While I had this kit lying around for about a year and a half I finally started it and finished the sustainer build and paint in under two weeks. It'll look very much the same as my first build above with one exception: car paint!:
Now that's some gloss!! This was my first and only paint job in the paint booth below before I realized it wasn't going to work and abandoned it. My final option to master car paint will require adequate ventilation in my garage and I'll park my car outside while I paint. The 500th time's the charm right?!
Finally I should note that, while I'm leveraging the original booster, I still have parts to build a second booster for a 3-stage version:
I'm a bit surprised that it remains totally stable without additional modification. That should be a fun flight if/when I attempt it.

Saturday, August 22, 2009

Spray booth as dust buster?

It's seriously frustrating to build something for weeks or months then only to fail on the last step, the paint job, due to dust. I bit the bullet and built a semi-permanent paint booth in a spare area of my house. Fisheye lenses make indoor photography a snap and here's a side view of the booth:

Here's the entrance view:

And here's the lovely view I'll enjoy while spraying fumes:
That fan is very powerful and pulls the 4-mil plastic walls all the way inward with it's high setting. I think it'll remove most of the fumes and overspray particles on its low setting. I plan to try some clear coat as a test this weekend and this setup should nail the problem.

Wednesday, August 19, 2009

M750 flight APPROVED... Drag race style!

I completed my altitude prediction report for EM-SEM-FITY on an M750 and our president and range safety officer approved the flight for Plaster Blaster! (click the thumbnail below for a legible JPEG):

Yay. My best prediction is the unweighted average of all the simulations and historic data: 21,333' (4.04 miles!). I tried to post this as a PDF as well as the RockSim file but I'm having way too many FTP issues right now so I give up.
I also shared this packet with Frank Hermes who's also attempting the President's 20K challenge. He had the excellent idea to launch our attempts simultaneously as an M750 drag race. Our club president, Paul Snow, approved this drag race as well! This should prove spectacular and Frank has promised to be a good sport when he loses. :)

4" V2 painted but not quite perfect

So several entries below you saw below that the white paint applied perfectly, then I masked (and re-masked 3x), then painted the black. Again dust was my enemy outside and the black ended up severely pock-marked. I patched the diffuse color with a black paint pen and, while not perfect, it looks pretty good from this distance:
Next I plan to set up a paint room inside my house (with robust ventilation of course) and I'll apply a clear coat to remedy the specular gloss. It'll probably still be dimpled but the clear coat should dampen the craters and obscure the bronzing of the paint pen patches. I vow to get this right some day!

Sunday, August 9, 2009

12,744' FTW!

[that's "For The Win" not "F*#k The World"]
Yesterday at Lucerne Dry Lake I flew EM-SEM-FITY on a Cesaroni L610-Classic motor to 12,744' and that's a new personal record!:
Here are some flame details (hot day, distant shot means serious convective optical warping):

That motor burns for 8 seconds and the flight was very cool with two exceptions:
  • I've optimized this rocket for motors of full-M weight so the CG/CP relationship yields a static stability margin of ~1.6 fully loaded. Since the L610 motor is half that weight the static margin shoots up to ~2.1 making the rocket slightly overstable. This caused mild coning on the way up and I lost some altitude as a result.
  • The drogue ejection charges popped exactly at apogee but the nose cone popped off as well thus dragging out the 7' main 'chute. This was supposed to be a dual-deploy flight so popping the main at over two miles can mean a big walk. And walk I did. I could see the parachute the whole time and found it about 1 mile out across the road. Luckily a fellow flyer named Steve kindly drove out to pick me up otherwise it would have been a long walk back.
Oh and I encountered a highly improbably coincidence yesterday. It took about 2 hours to prep the flight and before I carried it out to the pad I wanted to verify that my radio tracker was working. I turned on the receiver and got two out-of-sync signals. I walked around for a bit and located a flyer named Julian whose transmitter was running on the same frequency! There are roughly 50 transmitter frequencies available so how insane is this? I pulled the battery from my transmitter, Julian successfully recovered his rocket, and kindly pulled his battery shortly thereafter so I could reassemble and resume.
Now for some data... the initial fully loaded weight was 25.3 pounds and length is 94". Here are the flight summary and graph from the ARTS2 altimeter:
And the same for the Parrot 2 altimeter:
The average of the two barometric altitudes is 12,744'. I assumed a CD of 0.45 in RockSim and this predicted an altitude of 14,120' so this represents a large error. I attribute this both to the overstable coning I mentioned above as well as a guessed CD. If I iterate on CD in RockSim to match the average altitude I get 0.57. If I then re-run the M750 simulation with this CD I get 20,147' which is well below the San Diego club's 25,000' FAA waiver. More on this in my next blog entry.

Friday, August 7, 2009

Car paint + dust + wind = FAIL!

OK so you can't really tell in this photo but the booster has a large number of crater repellencies that I've narrowed down to a serious dust concentration in the air:
This was my second attempt to get it right and, while it's better than the first, there will be a third to nail it. Anyway the finish is very close to final from a coefficient of drag perspective so it will yield good data tomorrow.

P.S. I'm normally a much more rigorous photographer and post-production guy but I need to start packing...

Tuesday, August 4, 2009

Electronics bay, sled, and layout

I'm really very happy with the final electronics bay. Again Jack Garabaldi provided these fine components and the results exceeded my expectations. Here are the top and bottom of the sled sandwiched between the two plywood/composite caps for illustration purposes:
On the top-most image at top right is a Featherweight Parrot 2 altimeter. This is an unbelievably capable device and this will be the first time I've used it. On the lower left is my trusty ARTS2 altimeter and there are three total 9V battery mounts as well.
I should also note that I had a design epiphany during a meeting this morning... I always struggle with the best way to mount external switches to arm the electronics in a vertical position. Every hole you drill or slot you cut has the potential to weaken the structure under potentially tremendous flight forces.
Both altimeters use barometric sensors to determine altitude over the course of the flight and descent. Therefore you must drill a static port (hole) to allow access to external pressure. I calculated that I needed a single 1/4" diameter hole to ventilate the bay. I then carefully mounted the screw switch for the ARTS2 at top center of the sled aligned with that static port. I also positioned the side-mounted arming button for the Parrot 2 right next to the screw switch (mostly obscured in the photo). Now all I need to do is place a skinny screwdriver into the static port, screw the switch down to turn on the ARTS2, and then track right to push the button on the Parrot2 and arm that device. Nice!! One hole serves three purposes. Heh heh. And I have no external switches or extra weak spots!! Ist fantastisch!
Finally I wanted to strengthen the thin plywood caps so I simply laid out two circles of carbon fiber/Kevlar fabric on polyethylene film, saturated them with 15 minute West Systems epoxy, placed the caps on the fabric discs, overlaid another layer of polyethylene, and placed a 10 pound weight on top. Once cured I end up with a super smooth, glossy composite reinforcement on each cap:

Build/paint progress and simulation refinements

I've made quite a bit of progress on EM-SEM-FITY in the last few days. I applied car primer to the booster section and found a few more rough areas. I allowed this to dry then sanded down the remaining asperities. Tonight I applied the final coat of primer and that's drying now. Tomorrow I'll spray the booster and part of the nose cone glossy white and allow them to dry/cure overnight. Then on Thursday I'll apply the vinyl decal and at least one layer of clear coat to seal the decal and maximize gloss overall.
Now rewinding back to last night I fully assembled the rocket including an M1939 reload to determine an optimal amount of nose weight to yield a static stability margin of 1.65. This turned out to be 25 oz of led and epoxy in the nose tip. I butted the nose cone against the wall as the center of pressure and center of gravity are measured and reported from the nose tip. The wall makes it easier to use a tape measure:
Here's the technique I've always used to determine the amount of lead shot required for good stability. This allows easy addition of shot to the bag and the position provides and accurate static moment:
In addition to ensuring an optimal amount of nose weight I also recorded center of gravity and overall mass measurements that allowed me to further refine my RockSim design and simulations. That program does a pretty good job of calculating starting points for component mass and center of gravity but you really need to override both with measured values to generate the best simulations.
Here I've built a bulkhead for the nose cone, fit it into the shoulder, and applied 15 minute West Systems epoxy thickened with colloidal silica. This increases viscosity and prevents the epoxy from running down gaps around the disc while curing:
Tomorrow I'll add a single wrap of carbon fiber/epoxy to the inside of the shoulder to strengthen it and render the bulkhead impossible to extract.

Coefficient-Of-Drag-Tard

Ya learn something new every single day... Jack Garabaldi of What's Up Hobbies informed me of a feature of my ARTS2 altimeter that I didn't even know about. After a flight you download the accelerometer data to your computer and enter pertinent flight info (initial weight, size, etc). The program will then provide a motor analysis (letter class and average thrust)(I knew about this feature) but also calculates a coefficient of drag (CD). This coefficient ranks among the most influential unknowns in flight simulations. The good news is that it remains roughly constant as long as the structure and finish of the rocket stay fixed. In summary a single flight in the regime of target speeds will yield a CD that you can use to vastly improve future flight simulations in RockSim 9. I was floored when I performed the following post-analysis of my successful level 3 flight:
  • The original, optimistic RockSim 8 simulation was roughly 6,100' on an M2030 motor.
  • The actual, average barometric altitude of the two altimeters was 5,257' (ARTS2 = 5113, AltACC2C = 5400). This is 14% lower than the simulation.
  • I re-loaded the ARTS2 data into the Data Analyzer v1.6 program and ran the CD analysis. The data is noisy but the visual high average CD is roughly 0.44.
  • I took this actual CD and plugged it into the original RockSim design and the revised simulation is 5,215'!! That reduces the error to 0.7%. Damn. That's some predictive power.
Here's the calculated CD as a function of mach number (speed):
This, in combination with predominantly constructive feedback from The Rocketry Forum, has convinced me to pre-fly EM-SEM-FITY on either an L610 or L952 this next weekend at Lucerne. After this flight I can then calculate an actual CD and provide an excellent prediction of altitude for the actual M750 flight at Plaster Blaster.
This will be required as the range safety officer (RSO) is concerned that I'll exceed the club's standing 25,000' FAA waiver with an M750. If I preliminarily assume a CD of 0.45 for EM-SEM-FITY RockSim predicts a peak altitude of 22,087'. My research turned up only one flight with an M750 that attained 26,000 feet at Black Rock (Jack also provided this data point). I've found only four other historic altitudes all below 23,000'.
If my justification still cuts it too close to the waiver then I'll take a step down in motor size. Right now I'm looking at the Cesaroni M1060 but that sims to only 19,443' so that's not likely to exceed 20,000' which is the reason I'm doing all this in the first place. Fingers crossed...

Wednesday, July 29, 2009

My blog is like watching primer dry

Finishing is becoming easier and more rewarding so I continue to muddle through but this remains my least favorite phase. I wanted to share the final approach to booster section greatness with some pics, info, and time stats:

Since I used only gravity on the fin reinforcement (no vacuum or shrink tape) I did my best to squeegee out the excess resin to optimize weight/strength. The resultant texture was very pronounced and 10^6 coats of primer never would have filled it. Instead I used the miraculous SuperFil to fill and obscure that fabric texture as well as ramping the motor retainer lip down.
Mixing/application time: 45 minutes
Curing time: overnight

Here I've just applied the two heavy coats of UV Smooth Prime:
Mixing/application time: 60 minutes
Drying time: overnight

This is my new favorite trick from Dave Triano... spray a light guide coat of matte black paint, let dry, and start sanding. This pre-coat takes no time to apply and dry and it's easily the best way to ensure your final sanded area is completely uniform. It also shows gaps that require subsequent SuperFil. Buy those ShadowAero videos right now!!
Sanding time: 90 minutes (even with 60 and 80 grit sandpaper dammit!)
The very smooth, uniform sanded result:

I applied yet another ramping layer of SuperFil to transition/smooth out that motor retainer lip. I also found some areas with pits too deep for primer and filled those too.
Mixing/application time: 20 minutes
Curing time: overnight

Here are the final two heavy layers of UV Smooth Prime
Mixing/application time: 40 minutes
Drying time: overnight

I'll be sanding that off tomorrow and vibrating my hand nerves so they'll be numb for hours afterward. Seriously... can I hire someone to sand for me? Anyone? It'll pay better than minimum wage.
I should also note that, if you're using car primer and paint, there's literally no need to use finer than about 80 grit sandpaper. In fact it's obvious that the resultant grooves improve paint adhesion and Napa's single-stage paint film is still astonishingly glossy. I'll probably apply a couple of layers of clear coat as well once the vinyl lettering is on.