Monday, January 19, 2015

...and a UV-mapped render seems in order


I wanna fly it now!!

Initial V2 modeling complete

This morning I added a shoulder to the nose cone and a shock cord attach hoop that's smooth to reduce stress points:

I also built a rail guide by downloading the .dxf cross section from 8020.net and extruding a virtual rail within which I could bevel/extrude:

The larger hole of the three near the motor mount will be the Kevlar shock cord attach point.  I'll just tie a square knot or two in one end as an anchor and thread the cord up through the airframe to the nose cone.  The two smaller, opposing holes in the base are guides for the wood screws to retain the motor. Finally I improved the leading edge taper of the fins and sharpened up the bottoms to maximize adhesion to the heated build platform.

The airframe alone will require 15 hours to print at 0.3mm layer height or 25 hours at 0.2mm layer height (!) so I want to minimize the risk that the part will pop off before it finishes.

Sunday, January 18, 2015

Slice-a-rific

There are many free, open-source programs to slice 3D models into tool paths that can be used by a 3D printer.  I downloaded a installed a few this morning including CuraSlic3r and PrintRun/Pronterface. There's another package called Simplify3D that looks interesting, especially via this forum thread, but it's very steep at $140 and there's no trial version.  I've used Slic3r before at work but I think I'm liking Cura more now and here's the tool path preview of the V2's fin can and motor mount:

Teal-green is raft and support material, red is the model's exterior shell, green are inner shells, yellow is volumetric fill (10%), and blue are travel moves without extrusion.  Niceness!!

Saturday, January 17, 2015

Better living through additive manufacturing of a V2!!

Some of you know that I've been dabbling in 3D printing for three-ish years.  I ceaselessly admire the astonishing progress of garage-based hardware hackers using intellectual property from patents that have expired in recent years.  It appears that the masses using democratized technology continue to move far faster than the corporations that developed the IP in the first place!! One new startup, 3D Printer Works, arose from a successfully funded Kickstarter campaign.  I like their style and recently ordered their first product, The CreatorBot 3D, for home use:

And yes of course I upgraded to the pro package with dual extruders, a heated glass build platform, acrylic enclosure to prevent drafts, and the Raspberry PI with OctoPrint to enable WiFi printing. Who wouldn't?!
   With a nearly unparalleled prosumer build volume of 2,592 inand 1 ft. x 1 ft build plate I decided that my first home project would have to be a V2 with a 24mm motor mount to take the full range of Pro24 reloads.  This is the first rocket I've attempted to design in my go-to 3D package, Modo, and I'm very pleased with the initial version.  I started with V2 scale profile images from the interwebs and used them as background images in Modo.  I then added a cylinder and adapted the cross-sectional hoops to conform to the airframe shape.  I added edge loops at the fin root locations and extruded the fins directly out from the airframe.  The entire model below is previewed in Catmull-Clark Subdivision mode for maximum smoothness and that's the format I'll use to export the .stl files bound for equivalently smooth 3D printing:

That black feature in the center wireframe is a hypothetical Pro24 6GXL casing as a worst case motor length.  While CTI presently offers only 1, 2, 3, and 6G casings in Pro24 I do see 4, 5, and 6XL on both David Reese's Wildman West page and CTI's page so I'll assume they're forthcoming some day soon.  I still need to add features like the nosecone shoulder, shock cord mounts, and rail guide(s) but the exterior form exceeds my expectations and took only about 2 hours to complete.  I also used Modo's powerful and astonishingly versatile bevel tool to build both the vented motor mount and the interior walls of the airframe in a single operation set:

I plan to print with ABS that flows and extrudes reliably at 230˚C but its glass transition temperature hovers around 105˚C (221˚F).  NFPA specifies a maximum casing temperature of 200˚C for 160 N•s or smaller so this could be an issue.  ;)  As such I think that venting the motor tube inside the airframe will decrease the likelihood of structural failure due to motor casing heat.  If I observe melt damage I can always add exterior vents to the airframe and maybe I'll make them whistle while I'm at it.  For the first flight I'm just planning to use two diametrically opposed, wide-head wood screws and perhaps washers for motor retention.  Here's a top view showing the virtual 6XL casing in it's vented motor mount:

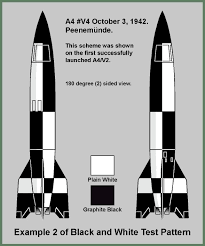
Once the model is finalized I also want to cleave it into pieces such that it can be printed in black and white using the dual extruders and according to the scale painting pattern so no painting will be required (and you know I LOVE painting!):

This first design will be 3" in diameter and 24.5" long.  At the limit I should be able to design and print a roughly 10" diameter V2 in four vertical segments.  More on this soon as my printer should arrive in the next two weeks. Yay, 3Dp!

Addendum: The site 3DPrint.com recently published this article on Steve Jurvetson who's advocating 3D printing for hobby rocketry for many good reasons.  He also gives a genial introduction to rocketry and finishes with some cool SpaceX stuff.  The revolution will be webcast!!

Wednesday, January 7, 2015

Happy 2015, Holtville!!

Hi, all, and happy 2015 to you as well.  Last Saturday was a stunningly perfect day for flying with 0-3MPH winds all day and all the way to the top.  Here's the second installment of my 240-slowed-to-480fps liftoff vids (full-screen HD and crank that audio please):

Go, GoPro!!  I can't believe how much downward force is exerted on those steel pads!  They're bouncing awhile after liftoff in several sequences.  Here are are some photos I was able to shoot between flying and moving the GoPro.  As you might have noticed in the vid I made two errors involving our equipment manager, Mike Caplinger, at this launch:
  1. I missed his 2-stage liftoff because he was prepping intently and then was ready all of a sudden and I didn't want to interrupt his launch sequence by asking him to pause while I ran over to start my camera.
  2. I left my K2045 alligator clips dangling underneath the motor.  It wasn't until later when he expressed vigorous concern with the damaged clips that I realized ignition exposure isn't as brief as I had once assumed.  In my defense the e-match leads were very short and others flew after me but I'll be sure to somehow secure them out of harm's way in the future, Mike.  
I had only one flight that day because of all the video, photos, and helping others but it was a doozie. A couple of years back I crashed my 4" Nike Smoke at Lucerne, my buddy Megan rebuilt its replacement entirely herself (I was hoping she'd do her L1 and L2 with it), and I've been sitting on this 1408K2045 for way too long.  My 1D mark IV shoots at 10fps so these two sequential liftoff frames are 0.1s apart:

The ascent was neck-snappingly fast, loud, and straight with a nice 14+ second coast to apogee.  Unfortunately the 'chute fouled but, fortunately, it landed in some soft dirt and remains entirely intact and ready to fly again:

Darrel Kelley and I discussed the fouling and he recommended this Fruity Chute method to reduce line tangle so I'll try that next time.  Thanks for reading and cheers to another year of great flying weather at our new site.