Wednesday, April 30, 2008

Electronics board layout v0

Tonight I shot some studio pix of the planned electrical components and 5.5" square plywood mounting board. This is the layout I'm currently considering (click to enlarge):

I'll make sure the dip switches and polarities are correct and tested prior to the flight (but I was lazy in Illustrator for now).  I was advised to use a single-deploy scheme where the main parachute is ejected at apogee.  This will simplify the flight and improve my chances of certifying but there's a risk I'll have to walk for miles if it's at all windy.  As a contingency I'm prepared to fly a dual-deploy scheme as well where a small parachute is ejected at apogee, the rocket tumbles to roughly 1000 feet above the ground, and then the main 'chute pops:

Saturday, April 19, 2008

CAD learning curve is steep!

I just spent about three hours in Vectorworks assembling this CAD version of the Nike Smoke kit. My intent was to show some of the internal connectivity then add details later but I think I'm giving up here:

Wednesday, April 16, 2008

Sanding can blow me

I had two simple goals tonight: 1) sand those bulkheads to fit neatly in the coupler and 2) piece together the exterior parts for a studio photo shoot.  Part 1 was quick.  Part 2... not so much.  I knew the shoulder of the nose cone was too big to fit into the upper payload tube so I'd planned to sand it down.  I visually estimated that it was only about 1/16" too big so WHY did I sand for two hours just now to barely fit the two parts together for the shoot!?!  I'm using a Black and Decker mouse sander with 100 grit sandpaper and it took forever.  I guess I'll try 80 grit next time.  Now my garage and everything in it, including my black car, has yet another layer of fine dust on it.  Good asbestosis lung times (yes I was wearing a respirator but still!).  Anyway I guess this shot was worth it as I would have to sand at some point anyway:

Tuesday, April 8, 2008

Crack kills!

Back to that bulkhead diameter problem...  The black gap in the following photo is roughly 1/8" wide at its peak and that's WAY too large to bond well to the inside of the coupler:

All four of the provided bulkheads were this diameter and that requires a solution.  Last year I bought a plunge router and a pair of Jasper circle jigs based on recommendations from this Rocketry Planet article on cutting perfect circles and discs.  I clamped a sheet of 1/2" plywood down to my workbench and cut three new bulkheads just slightly larger than the inner diameter of the coupler (nothing a little sanding won't fix.

The front-most disc is the original provided by BSD and my three new discs are stacked behind it.  Problem solved.

Starting the Nike Smoke build...

First thing's first.  I typically start by sanding the fins but my Delta sander is barely long enough to accomplish this task!:
One important note is that I'm both builder and photo-documenter of the build.  I'm learning that actions shots are difficult so I'll often use the RF remote you'll see in my photos.  My flight shots should be much better!

Design, buy parts, and build or buy a kit and build?

In 2002 I began considering designs for a level 3 attempt.  Then I bought RockSim and in May of 2006 started designing "Tercero 2":

However when I considered the costly and piecemeal approach to buying parts for Tercero 2 it was mentally difficult to get started.  Earlier this year I decided to instead buy a kit as my level 3 certification vehicle.  The scale replica of the Nike Smoke from BSD rocketry:
This photo is from their web site but mine will be painted with these authentic colors as well.  This will be my biggest rocket ever at 7.5 inches in diameter and 8 ft. 11 inches high!  This is a great kit with a nice 4 foot long fiberglass nose cone and well machined parts... except for the plywood bulkheads.  
     There are four bulkheads and three of these are too small to fit snugly inside the tube coupler.  I contacted Just Rockets via e-mail and told them about this but never got a reply.  I arrived at another solution and you'll see that fix in another blog post.  
     One final note is that I plan to violate the K.I.S.S. principle slightly by adding a video camera to this kit.  I have a spare MiniDV camera and the onboard videos I've seen in the past are just too cool to skip in my project.  More details on this later as well.

Thursday, April 3, 2008

Some introductory stuff for those who love homework...

Rocket motor power designations allowed in California range from 1/4A through M with an 'A' motor yielding a maximum of 2.5 N•s of total impulse (the area under the thrust/time curve). Each successive letter is a maximum of double the previous letter and here's a handy motor letter range chart.  The biggest motor one can typically buy in a hobby store is a 120 N•s 'G' motor and motors above that impulse are designated as "high power" and their certification and use are regulated by organizations like Tripoli, NAR, and CAR.

A typical motor is specified by a code including the following: [letter designating maximum total impulse][average thrust in Newtons (N)]-[time delay between motor burnout and parachute ejection].  For instance my favorite motor is an Aerotech K1100-14.  The 'K' denotes a total impulse of 1500 N•s (between 1280.1-2560 N•s).  The 1100 is the average thrust in newtons and this equals ~242 pounds of force!  This particular motor waits for 14 seconds after burnout before ejecting the parachute.  Other delay options include 6, 10, & 18 seconds.  Sometimes a motor has a 'P' in place of a time delay and this means the motor is Plugged and requires electronic timing and ejection actuation. [Ejectuation!?]

US rockets has proposed an improvement to this nomenclature that adds the exact total impulse number before the letter denoting impulse class.  In this revised scheme the motor above would be called 1500K1100-14.  It's a bit longer but as motor classes increase the range of total impulses grows geometrically.  It also allows one to quickly estimate burn time by dividing total impulse by average thrust (1500 N•s/1100 N = 1.4 s).  Unfortunately this nomenclature has not caught on and we're largely stuck with the antiquated scheme.  I'll go ahead and use the new nomenclature because... it's my blog!

Level 1 certification requires that one fly an H- or I-class motor and get the rocket back in ready-to-fly condition.  As a Tripoli member I certified level 1 in 2000 using an Aerotech 240H242-10.
Level 2 begins with a 50 question, multiple choice test before flying a J, K, or L motor and retrieving the rocket intact.  Half of the questions are technical and half are on safety.  I scored 100% on my exam and successfully flew an Aerotech 1280J415-14 in 2001 to earn level 2:


Level 3 requires that one create a ton of documentation on a planned M, N, or O flight and work with two Technical Advisory Panel members who have already earned their level 3 certs. Once all the pre-work is complete and the rocket is built then one flies an M motor and, upon successful retrieval, is awarded level 3 certification.
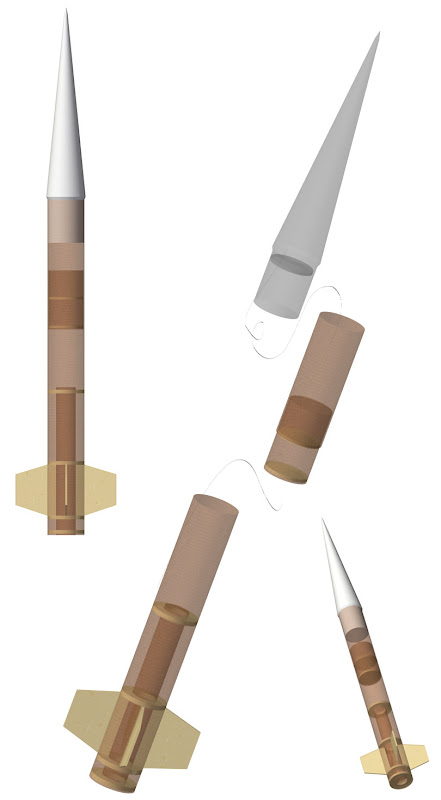
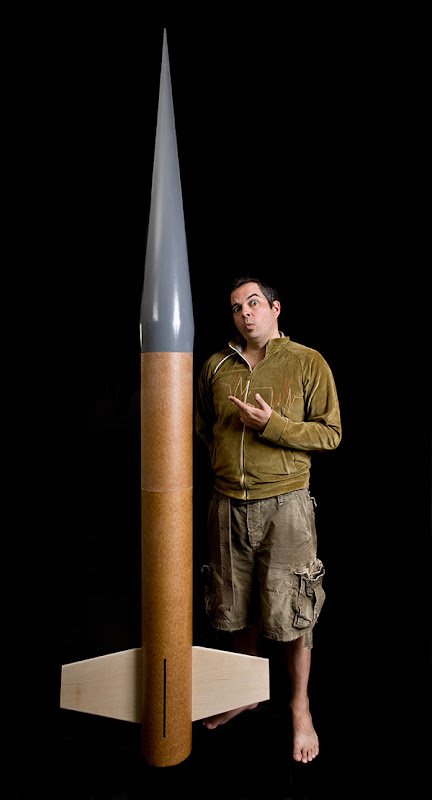
   I plan to attempt my level 3 certification flight on June 7th, 2008 at the Plaster City launch site in the desert East of San Diego.  I've been advised to apply the K.I.S.S concept (Keep It Simple, Stupid) to my level 3 so I'm going to fly the smallest M motor the 5417M1297-P.

Please contact me if you'd like to attend and/or help with photo and video documentation.  Stay tuned for more updates as I step through the process, build, and flight.